
Let's Learn 11ty Part 9: Data Revisited
01 Aug 2022
#eleventy
#ssg
#tutorial
#webdev
We are back again with more Eleventy. I said I would come back and explain and showcase some things when I understood them better.
That time has arrived!
To explain these concepts more clearly, I will not be using the learneleventy project we already have. I am going to make a new one with the sole purpose of elaborating the concepts we left over.
You don’t have to start a new project. You will however need to make some modifications to the project we were working on. I nevertheless suggest you do - to see things in isolation and then incorporate them later.
Don’t worry, I’ll explain what you have to do if you’re using the existing version.
For Those Starting A New Project
If you are starting afresh follow this series steps until Part 4.
For Those Using The Project We Have
If you are using the project we have, make these changes:
- Delete everything in the blog folder - we’ll be getting the posts from somewhere else.
External Data
What we are going to do now is fetch data (posts) from elsewhere and render it on our site.
For that, we will use the Devto API. Initially we had used Hashnode, but that graphql API is nowl requires a pro account.
Let’s Begin
Because we want to display the post data, we will need our personal API key from DevTo.
I have gone over how to get your DEV.to key before.. Those step are in this article. I’m sorry, I don’t fell like writing it again
Once you have that, create a .env file:
DEV_TO_API_URL=https://dev.to/api/
DEV_API_KEY=
Then we need to install dotenv
pnpm add dotenv
In _data create a post.js file with this in it:
import "dotenv/config";

const { DEV_API_KEY, DEV_TO_API_URL, API_PER_PAGE_MAX } = process.env;

export default async function () {
  const res = await fetch(
    DEV_TO_API_URL + `articles/me/published/?per_page=${API_PER_PAGE_MAX}`,
    {
      headers: {
        "api-key": DEV_API_KEY,
        Accept: "application/vnd.forem.api-v1+json",
      },
    },
  );

  const posts = await res.json();

  return posts;
}
Global data refers to files we place in the
_datafolder. In most instances we use global data for things we want site wide, for example the site title and description.
I must add an addendum to this. The other thing we use the _data folder for is to get data from external sources, like APIs.
If you have a Dev.to account, remember to replace YOUR_USERNAME - with yours.
Before we modify blog.njk, we need to made a new filter because the postDate one won’t work with our new data.
First install date-fns
pnpm add date-fns
Then create a PubDate.js file in _includes/filters/PubDate.js and add this in it:
import { parseISO, format } from "date-fns";

export default function PubDate(date) {
  const dateString = parseISO(date);
  const formattedDate = format(dateString, "dd MMM, yyyy");
  return formattedDate;
}
Then import it into eleventy.config.js
import PubDate from "./src/_includes/filters/PubDate.js";

export default function (eleventyConfig) {
  eleventyConfig.addFilter("pubDate", PubDate);

  //rest of config
}
Now, update blog.njk file and make sure our for loop looks like this:
<!-- src/blog.njk -->
<h1 class="">Blog Home</h1>

<ul class="">
  {% for post in posts %}
  <li class="blog-list-item shadow-lg bg-white p-4">
    <a
      href="/blog/{{ post.slug }}/"
      class="block font-semibold text-lg hover:text-cyan-800 blog-link"
      >{{ post.title }}</a
    >
    <small class="blog-date">{{ post.published_at | pubDate }}</small>
  </li>
</ul>
Things to note:
- Since we are fetching data from an API, we are no longer using
collections.post. Instead, we are looping through the posts - which is the file we made
NOTE: Info/files in the
_datafolder can be accessed from anywhere on your site
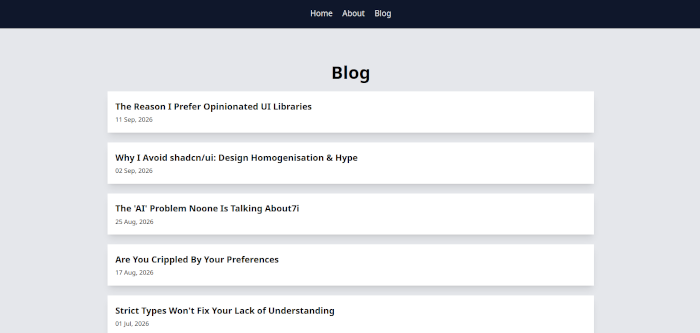
With a few modification we now have a new list of posts fetched from and external source
Computed Data
As we are now able to display the fetched posts, we can now work rendering the individual posts.
Let’s make a new file called postLayout.njk file and have this in it:
---
layout: base
pagination:
  data: posts
  size: 1
  alias: post
permalink: "/blog/{{ post.slug | slugify }}/"
templateEngineOverride: "njk,md"
eleventyComputed:
  title: "{{ post.title }}"
---

<div>
  <h1>{{ post.title }}</h1>

  {{ post.body_markdown | markdown | safe }}
</div>
Pay very close attention to the indentation.
One second. If you notice, there is a markdown filter in the post body, but didn’t make one. We have to do that first.
We will start by… you guessed it, installing something
pnpm add markdown-it
Create the filter in our filters folder:
import markdownIt from "markdown-it";

const md = markdownIt({ html: true });

export default function Markdown(content) {
  return md.render(content || "");
}
Then import it into our config:
import Markdown from "./src/_includes/filters/Markdown.js";

export default function (eleventyConfig) {
  eleventyConfig.addFilter("markdown", Markdown);

  //rest of config
}
Let’s go back to the frontmatter:
- layout: like what we’ve been doing prior, we are setting it up such that this layout uses the base layout
- pagination: This is the special sauce we’ve introduced to generate the individual post pages from data that we’ve provided.
- data: This refers to the data we want to paginate through. In our case - posts.
- size: This defines how much info we want on each generated page. Since we want one post per page, we’ve set it to 1.
- alias: This is a different name you can give to the items (posts) you are paginating through. This can be anything you want
- permalink: We looked a permalink in passing before. Here, we are making better use of it by specifying the resulting URL that will be created for each post.
- templateEngineOverride: During my tests I found that in order to render the post content properly - raw markdown in this case - I had to set a template override telling Eleventy which file types we want rendered and in what order.
- eleventyComputed
eleventyComputed
This falls under the Computed Data of Eleventy’s Data Cascade. At the end of it - the cascade - we may want to add additional data to our templates. That is where the eleventyComputed key comes in. We have used it to add title to our individual post’s meta tag - the same key we set for our pages when we began this journey.
NOTE:
slugifyis the improvedslugfilter that helps us create more readable URLs - from now on we useslugify
Let’s now move to our blog folder and in it make a post.njk file with this in it:
---
layout: postLayout
---
If we have done everything correctly, pages for our posts should have been generated and we can navigate to them:
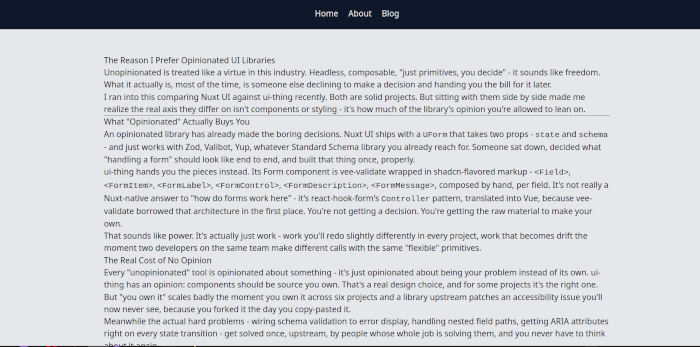
it doesn’t look pretty, but we can now read our posts on our Eleventy site
Some FAQ Stuff
Why don’t I have the parts as separate branches in the repository? The thought crossed my mind, but a couple of things stopped me from doing that:
- I’m not that versed at managing multiple branches without killing everything.
- With CloudCannon creating a branch for its workflow and the main one for the current flow, that’s what I’m comfortable working with on my own.
Update: 16 September 2026:
We have branches now! Yay!
Conclusion
With some time, research and a lot of asked questions we now have a better understanding of Eleventy’s Data.
In this article we:
- Switched from local markdown files to fetching them from an API
- Listed the fetched posts on our site
- Rendered the individual post on the site
As always:
- The live site: https://learneleventy.netlify.app
- The working repo: https://github.com/Psypher1/learneleventy
- The docs: https://www.11ty.dev/docs/
- The discord: https://www.11ty.dev/blog/discord/
Thank you for reading, let’s connect!
Thank you for visiting this little corner of mine. My email and DMs are always open; if you want to chat or collaborate on something, shoot me a email
Where you can get hold of me: